
GoPro telemetry overlay for track days, rendered in your browser
Turn a GoPro onboard into an overlay video with speed, lap time, delta, track map and OBD data — synced from the camera's own GPS, rendered on your computer, nothing uploaded.
The onboard is the part of a track day people actually watch. A lap time is a number; a lap with the speed, the delta and the track map running over the footage is something you can send to a friend, post in a group, or watch again in January when you’re planning next season.
Making that video has always meant a dedicated app, a manual sync, and a render that ties up your phone or your evening. This post covers how the overlay render in ApexLog works — I built it, so read the tool-specific parts with that in mind. The camera side applies to anyone with a GoPro and a lap timer.
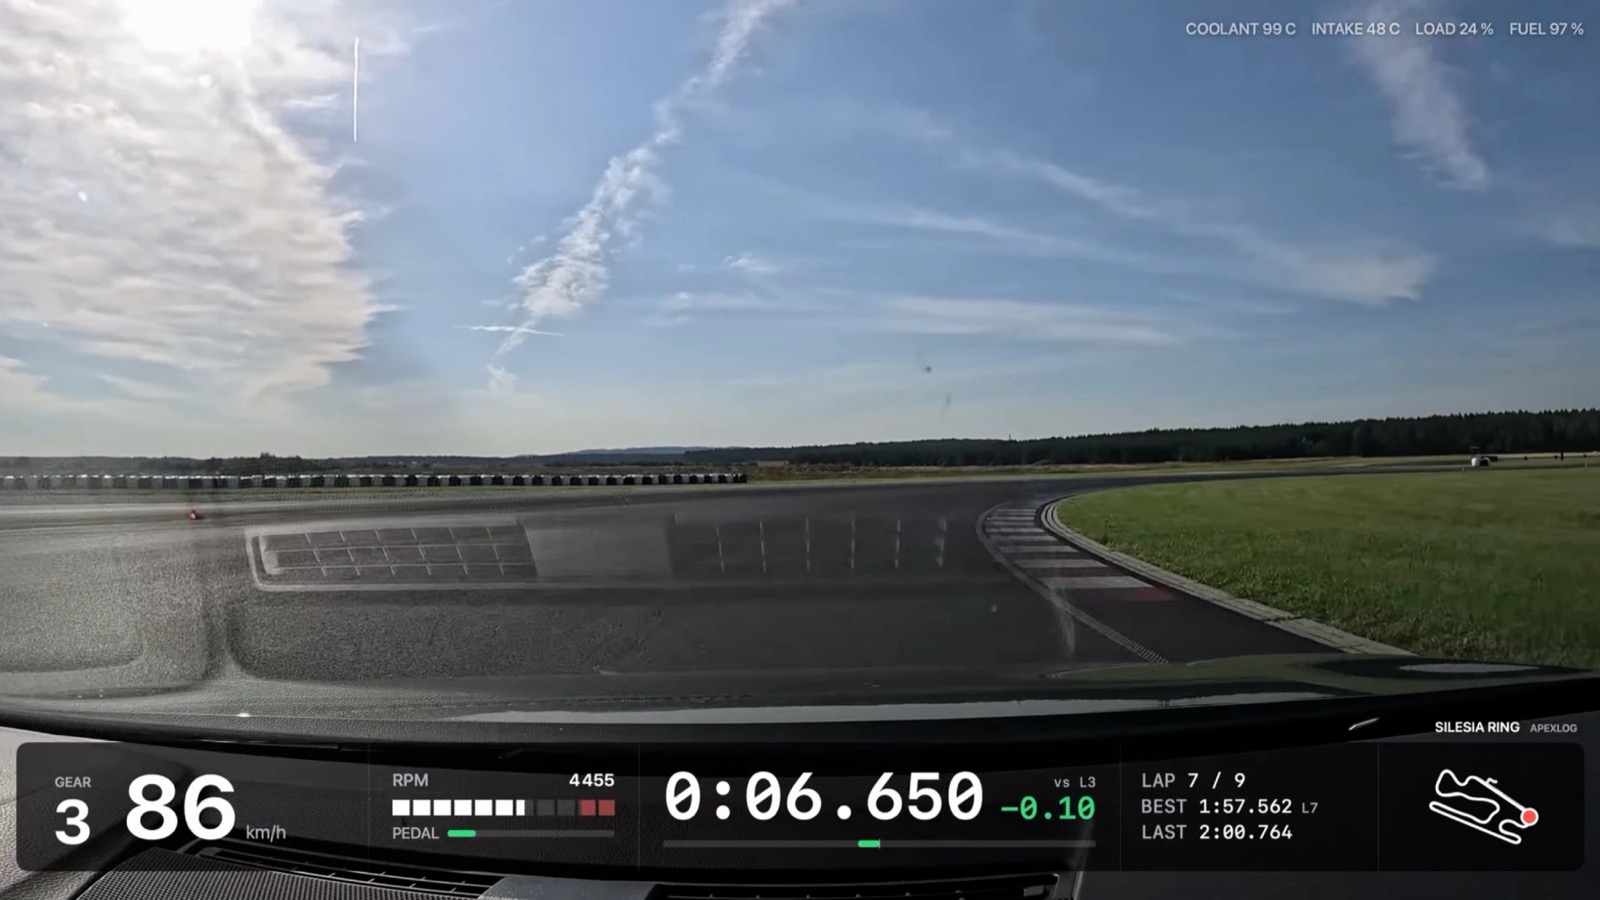
Here’s the result, from my Golf GTI Edition 50 at Silesia Ring — lap 7 of 9, the best lap of the session: 1:57.562 on GPS timing, 1:57.570 on the organizer’s official timing:
What’s on the video
The clip uses the Strip style — one bar just above the dashboard, so the road stays clear:
- Speed with the gear on the left.
- RPM as a segmented bar, with the accelerator pedal under it.
- Running lap time and delta. The delta compares each lap with the
fastest other lap of the session — the best lap for every other lap, and
the second-fastest one while you’re on the best lap. That’s why the clip
says
vs L3: on the best lap, a delta against itself would read+0.00all the way round. - Lap counter, BEST and LAST, with the lap number of the best.
- Track mini-map with the car’s position.
- Engine channels along the top — here coolant, intake air, engine load and fuel level. You pick which ones, up to eight.
Gear, RPM, pedal and the engine readouts come from OBD channels recorded with the session; on a car or a session without OBD, those parts simply aren’t drawn. The two other styles, Broadcast (a timing tower at the top of the frame) and Classic (speed, lap block and map along the bottom), also draw a G-meter. Speed, lap timing, map and G can each be switched off.
Where the sync comes from
The hard part of any overlay is lining up two clocks: the camera’s and the lap timer’s. ApexLog doesn’t talk to the camera at all — it reads the GPS that the GoPro already wrote into the file.
Since the HERO11 Black, GoPro stores a 10 Hz GPS stream inside the MP4 with the UTC time on every sample. The lap timer’s samples carry UTC too. So the offset between “second 0 of the video” and “lap timer time” is first a subtraction of two timestamps. Then ApexLog slides the camera’s speed curve against the telemetry speed curve within ±2 seconds to find where they match best. On my HERO13 chapter that refinement moved the offset by 42 ms, with the two speed curves matching at a correlation of 0.9999.
In practice: press record on the GoPro, drive, and hand the file over afterwards. No pairing, no starting both devices together, no clap in front of the lens. If you picked the wrong file, ApexLog says so instead of producing a nonsense overlay — footage from another day or another place is refused.
| Camera | How it syncs |
|---|---|
| GoPro HERO11 Black, HERO13 Black | Automatically, from GPS time in the file (tested on a HERO13 Black) |
| GoPro HERO5–HERO10 Black, MAX | These record GPS in an older layout that ApexLog also reads, but I haven’t tested one yet |
| GoPro HERO12 Black, other cameras that record MP4 | One sync point placed by hand |
The manual point works the same way as for a YouTube onboard: play the file, pause at a moment you can find on the speed trace — pulling away from the paddock, or the first hard braking — and click that moment on the chart.
Rendering on your own computer
The render runs in a desktop browser — Chrome, Edge or Safari. The browser decodes the original file, draws the overlay on each frame, encodes the result to H.264 and writes an MP4 with the original audio. Nothing is uploaded: the only data that crosses the network is the session telemetry the page already loads.
Options in the render panel:
- Range — the whole file, the best lap, or a range of laps, with 3 seconds of run-up and run-out by default.
- Style — Broadcast, Strip or Classic, and which elements to draw.
- Output — 1080p, or the same size as the source (4K in, 4K out).
- Units — km/h or mph, defaulting to your account setting.
How fast it goes depends on the machine and the browser. On my Mac, a full 4K HEVC chapter rendered to 1080p at roughly 9× real time in Chrome and about 2× in Safari. A 20-minute session in Chrome is a coffee, not an evening. Keep the tab open while it runs; you can move around the rest of the app in the meantime.
A few limits, so they don’t surprise you:
- Desktop only. On phones and tablets the render panel isn’t shown.
- HEVC footage (GoPro’s default at 4K and above) decodes in Safari and in Chrome on macOS. Chrome on Windows needs Microsoft’s HEVC extension.
- GoPro chapters. Long recordings are split into ~4 GB files (
GX01…,GX02…). Each chapter is rendered on its own; laps that sit in another chapter are greyed out in the range picker.
What you need
- A session in ApexLog with GPS telemetry — imported from a RaceChrono
export (
.rczor CSV v3) or a RaceBox CSV. The RaceChrono import and RaceBox import pages cover the upload. For engine channels on the video, record OBD into the same session. - The original file from the camera — straight off the SD card, not a copy re-exported by a phone app or a video editor.
- A desktop browser.
Then open the session, go to the Telemetry tab, find Overlay video, pick the file, check the preview frame, and press Render & save.
After the render
The MP4 is yours: upload it to YouTube, cut it into a short, send it to the group chat. If it goes to YouTube, link it back to the session and you get the synced player as well — the same footage with the map and trace following it, for the times you want to work through a lap rather than show it. Either way, the lap stays next to the setup, tires and pressures it was driven on, in the track day logbook.
Update 2026-10-05: live overlay, Render this clip, notes from audio
Since this post was published the overlay no longer needs a render to be seen. A video you play from disk on the Telemetry tab shows the same overlay on the picture while it plays, using the style you picked here — see the live overlay. When you like what you’re watching, Render this clip opens Overlay video ready to render that clip, with the same sync and no second file pick.
Two things for the sound on the file. Notes from audio turns what you said in the clip into notes at the moment you said them, which you review before saving (how it works). And Mute my comments silences your spoken comments in the rendered video, so you can talk on track and still publish a clean clip; it also applies to voice notes you saved earlier. Your original file is not changed.
Try it with one session
If you have a session file and the GoPro footage from the same stint, the whole thing is an import, a file pick and one button:
Import a session and render your overlay →
Free during beta.